Learn
Stitch via MCP
Connect IDEs and CLIs to Stitch using the Model Context Protocol.
The Stitch Model Context Protocol (MCP) server allows your favorite AI tools like Cursor, Antigravity, or the Gemini CLI to directly interact with your Stitch projects.
Understanding Remote MCP
Section titled “Understanding Remote MCP”Most MCP servers you use are Local. They read files on your hard drive or run scripts on your machine. Stitch is a Remote MCP server. It lives in the cloud.
Because it is remote, it requires a secure “handshake” to ensure that the AI agent acting on your behalf actually has permission to modify your designs.
API Keys vs OAuth
Section titled “API Keys vs OAuth”The Stitch MCP server supports two authentication methods:
- API Keys: Persistent keys generated in the Stitch Settings page.
- OAuth: A browser-based authentication flow required by specific AI clients that do not support manual key entry, or for environments where storing persistent secrets on disk is restricted.
When to use which
Section titled “When to use which”In most cases, API Keys are the easiest approach. They are the fastest way to get your tool connected. However, OAuth is worth the extra minute of setup in specific situations.
| Scenario | Use API Keys if… | Use OAuth if… |
|---|---|---|
| Client Support | Your tool (e.g., Cursor, Antigravity, or the Gemini CLI) accepts an API key in a config file or environment variable. | Your tool (e.g., web-based tools) requires a “Sign In” flow and doesn’t provide a way to manually input a key. |
| Storage Policy | You are on a private machine where saving a secret key in a local .json or .env file is standard practice. | You are in a “Zero-Trust” or ephemeral environment where saving persistent secrets to the hard drive is blocked or risky. |
| Revocation | You are comfortable manually deleting a key from the Stitch Settings page and then finding/removing it from your local files. | You want the ability to “Log Out” and instantly invalidate the tool’s access via the Stitch Settings page without hunting for local files. |
| Session Logic | You want a connection that stays active indefinitely until you manually change it. | You prefer a session-based connection that can be set to expire or require a re-approval after a period of inactivity. |
API Key Setup
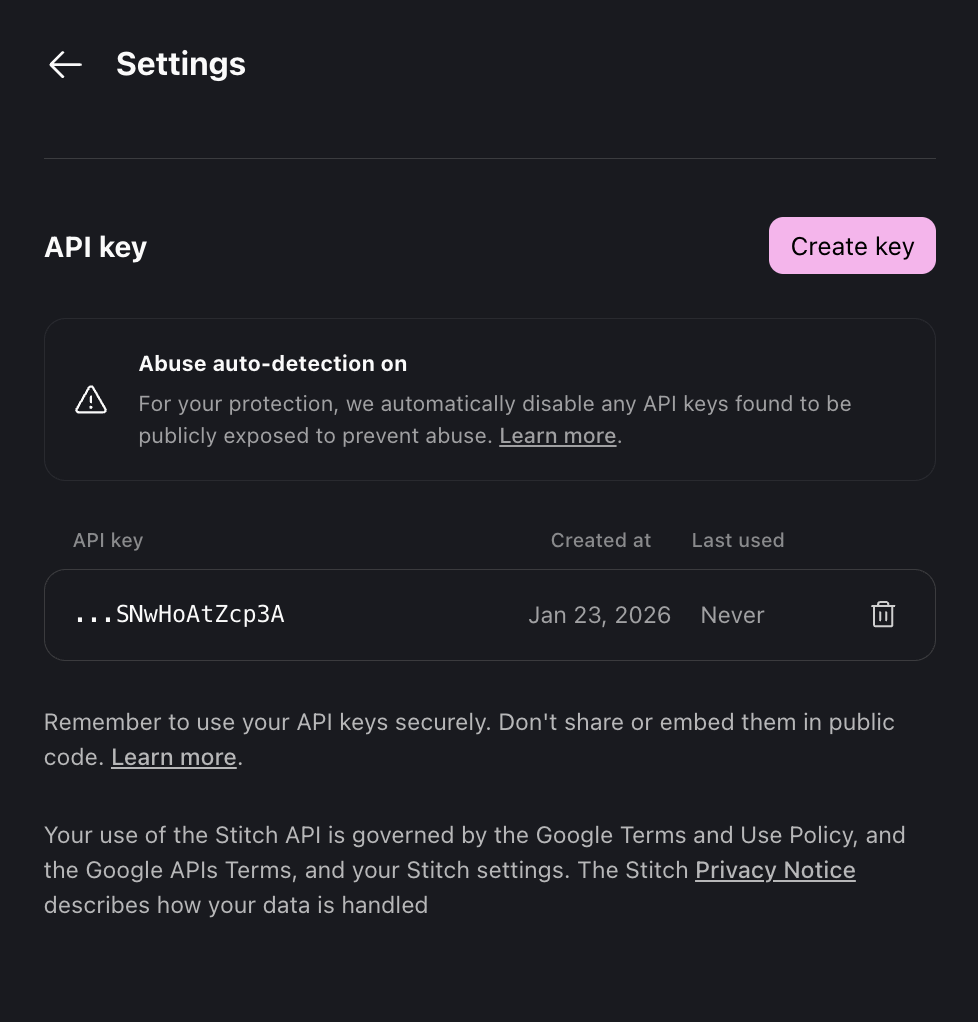
Section titled “API Key Setup”- Go to your Stitch Settings page.
- Scroll to the API Keys section
- Click on “Create API Key” to generate a new API key.
- Copy the API key and save it in a secure location.
Storing API Keys
Section titled “Storing API Keys”Never store your API key in a place where it can be exposed to the public. Never commit your API key to a public repository. Don’t include your API key in client-side code that can be viewed by others.
MCP Client Setup
Section titled “MCP Client Setup”Gemini CLI
Section titled “Gemini CLI”Install the Stitch extension for the Gemini CLI.
gemini extensions install https://github.com/gemini-cli-extensions/stitchCursor
Section titled “Cursor”Create a .cursor/mcp.json file with the following entry:
{ "mcpServers": { "stitch": { "url": "https://stitch.googleapis.com/mcp", "headers": { "X-Goog-Api-Key": "YOUR-API-KEY" } } }}Antigravity
Section titled “Antigravity”In the Agent Panel, click the three dots in the top right and select MCP Servers. Click, Manage MCP Servers. Select “View raw config” and add the following entry:
{ "mcpServers": { "stitch": { "serverUrl": "https://stitch.googleapis.com/mcp", "headers": { "X-Goog-Api-Key": "YOUR-API-KEY" } } }}VSCode
Section titled “VSCode”Open the Command Palette (Cmd+Shift+P) and type “MCP: Add Server”. Select “Add MCP Server”. Select HTTP to add a remote MCP server. Enter the Stitch MCP URL, https://stitch.googleapis.com/mcp. Set the name to “stitch” and confirm.
Then modify the mcp.json file to add the API key:
{ "servers": { "stitch": { "url": "https://stitch.googleapis.com/mcp", "type": "http", "headers": { "Accept": "application/json", "X-Goog-Api-Key": "YOUR-API-KEY" } } }}Claude Code
Section titled “Claude Code”Use the claude mcp command to authenticate and add the following entry:
claude mcp add stitch --transport http https://stitch.googleapis.com/mcp --header "X-Goog-Api-Key: api-key" -s userOAuth Setup
Section titled “OAuth Setup”We need to generate two secrets to allow your MCP Client to talk to Stitch:
- Project ID: The container for your work.
- Access Token: The short lived key for to verify authentication for the project.
1. Install the Google Cloud SDK
Section titled “1. Install the Google Cloud SDK”Stitch relies on the gcloud CLI for secure authentication. If you don’t have it, you can install it globally through this quickstart, or you can install it as a standalone like the instructions below.
Standalone
Section titled “Standalone”# Download and install (simplified for standard environments)curl https://sdk.cloud.google.com | bashexec -l $SHELL
# Set local configuration to avoid promptsexport CLOUDSDK_CORE_DISABLE_PROMPTS=1Homebrew
Section titled “Homebrew”brew install --cask google-cloud-sdk2. Double-Layer Authentication
Section titled “2. Double-Layer Authentication”You need to log in twice. Once as You (the user), and once as the Application (your local code/MCP client).
# 1. User Login (Opens Browser)gcloud auth login
# 2. Application Default Credentials (ADC) Login# This allows the MCP server to "impersonate" you securely.gcloud auth application-default login
3. Configure the Project & Permissions
Section titled “3. Configure the Project & Permissions”Select your working project and enable the Stitch API. You must also grant your user permission to consume services.
# Replace [YOUR_PROJECT_ID] with your actual Google Cloud Project IDPROJECT_ID="[YOUR_PROJECT_ID]"
gcloud config set project "$PROJECT_ID"
# Enable the Stitch APIgcloud beta services mcp enable stitch.googleapis.com --project="$PROJECT_ID"
# Grant Service Usage Consumer roleUSER_EMAIL=$(gcloud config get-value account)gcloud projects add-iam-policy-binding "$PROJECT_ID" \    --member="user:$USER_EMAIL" \    --role="roles/serviceusage.serviceUsageConsumer" \    --condition=None
4. Generate the Secrets (.env)
Section titled “4. Generate the Secrets (.env)”Finally, we generate the Access Token and save it to a .env file.
This overwrites any existing
.envfile
# Print the tokenTOKEN=$(gcloud auth application-default print-access-token)
# Note: This overwrites any existing .env fileecho "GOOGLE_CLOUD_PROJECT=$PROJECT_ID" > .envecho "STITCH_ACCESS_TOKEN=$TOKEN" >> .env
echo "Secrets generated in .env"
5. Keeping it Fresh
Section titled “5. Keeping it Fresh”Note: Access Tokens are temporary (usually lasting 1 hour). When your MCP client stops responding or says “Unauthenticated,” you need to:
- Re-run the commands in Step 4 to update your
.envfile - Copy the new
STITCH_ACCESS_TOKENvalue from.envinto your MCP client config file
Most MCP clients don’t automatically read from .env files, so you’ll need to manually update the token in your config file each time it expires.
Setting up your MCP Client
Section titled “Setting up your MCP Client”Copy the values from your .env file into your MCP client configuration. Replace the placeholders below with the actual values from your .env file:
<YOUR_PROJECT_ID>→ Value ofGOOGLE_CLOUD_PROJECTfrom.env<YOUR_ACCESS_TOKEN>→ Value ofSTITCH_ACCESS_TOKENfrom.env
[!IMPORTANT] You will need to manually update the
Authorizationheader in your config file every hour when the access token expires. See Step 5 above for the refresh workflow.
Cursor
Section titled “Cursor”Create a .cursor/mcp.json file with the following entry:
{ "mcpServers": { "stitch": { "url": "https://stitch.googleapis.com/mcp", "headers": { "Authorization": "Bearer <YOUR_ACCESS_TOKEN>", "X-Goog-User-Project": "<YOUR_PROJECT_ID>" } } }}Antigravity
Section titled “Antigravity”In the Agent Panel, click the three dots in the top right and select MCP Servers. Click Manage MCP Servers. Select “View raw config” and add the following entry:
{ "mcpServers": { "stitch": { "serverUrl": "https://stitch.googleapis.com/mcp", "headers": { "Authorization": "Bearer <YOUR_ACCESS_TOKEN>", "X-Goog-User-Project": "<YOUR_PROJECT_ID>" } } }}VSCode
Section titled “VSCode”Open the Command Palette (Cmd+Shift+P) and type “MCP: Add Server”. Select “Add MCP Server”. Select HTTP to add a remote MCP server. Enter the Stitch MCP URL, https://stitch.googleapis.com/mcp. Set the name to “stitch” and confirm.
Then modify the mcp.json file to add the headers:
{ "servers": { "stitch": { "url": "https://stitch.googleapis.com/mcp", "type": "http", "headers": { "Accept": "application/json", "Authorization": "Bearer <YOUR_ACCESS_TOKEN>", "X-Goog-User-Project": "<YOUR_PROJECT_ID>" } } }}Claude Code
Section titled “Claude Code”Use the claude mcp command to add the server:
claude mcp add stitch \  --transport http https://stitch.googleapis.com/mcp \  --header "Authorization: Bearer <YOUR_ACCESS_TOKEN>" \  --header "X-Goog-User-Project: <YOUR_PROJECT_ID>" \  -s user
# -s user: saves to $HOME/.claude.json# -s project: saves to ./.mcp.json
Gemini CLI
Section titled “Gemini CLI”Install the Stitch extension for the Gemini CLI:
gemini extensions install https://github.com/gemini-cli-extensions/stitchAvailable Tools
Section titled “Available Tools”Once authenticated, your AI assistant will have access to the following tools to manage your Stitch workflow. See the Reference for full schemas and details.
Project Management
Section titled “Project Management”create_project: Creates a new container for your UI work.- title (string): The display name of the project.
get_project: Retrieves specific details for a single project.- name (string): The resource name of the project.
list_projects: Retrieves a list of all your active designs.- filter (string): Filters by owned or shared projects.
Screen Management
Section titled “Screen Management”list_screens: Fetches all screens within a specific project.- projectId (string): The ID of the project to inspect.
get_screen: Retrieves specific details for a single screen.- name (string): The resource name of the screen.
AI Generation
Section titled “AI Generation”generate_screen_from_text: Creates a new design from a text prompt.- projectId (string): The ID of the project.
- prompt (string): The text prompt to generate a design from.
- modelId (string): The model to use (
GEMINI_3_FLASHorGEMINI_3_1_PRO).
edit_screens: Edits existing screens using a text prompt.- projectId (string): The ID of the project.
- selectedScreenIds (string[]): The screen IDs to edit.
- prompt (string): The edit instruction.
generate_variants: Generates design variants of existing screens.- projectId (string): The ID of the project.
- selectedScreenIds (string[]): The screen IDs to generate variants for.
- prompt (string): Text guiding variant generation.
- variantOptions (object): Variant configuration (count, creative range, aspects).
Design Systems
Section titled “Design Systems”create_design_system: Creates a new design system with foundational design tokens.- designSystem (object): The design system configuration (display name, theme).
- projectId (string): Optional. The project to associate the design system with.
update_design_system: Updates an existing design system.- name (string): The resource name of the design system asset.
- projectId (string): The project ID.
- designSystem (object): The updated design system content.
list_design_systems: Lists all design systems for a project.- projectId (string): Optional. The project ID to list design systems for.
apply_design_system: Applies a design system to one or more screens.- projectId (string): The project ID.
- selectedScreenInstances (array): Screen instances to update (from
get_project). - assetId (string): The design system asset ID (from
list_design_systems).
Terms of Service
Section titled “Terms of Service”By using this product you agree to the terms and conditions of the following license: Google APIs Terms of Service.